Usually in the fall I work on Christmas gifts for my friends and family. I’m a little late this year (like usual) and I’m working on them now. Better late than never, I say. So the other day I made soap. I really like this recipe. It lathers nicely and is very mild. I have gotten many compliments on it.
First, I had to decide what fragrance. I pulled out all my little bottles of smelly stuff, 1 clove, 1 juniper, 1 bay, 3 cinnamon and 5 peppermint! Rosemary peppermint is my favorite but no Rosemary. Plain peppermint? Nope. Cinnamon? Not feeling that. Juniper bay? Oddly enough, when I took the caps off and smelled them together, it worked!

Little bottles of smelly stuff.
If you’re going to make soap, you must have a scale. I cannot over emphasize the importance of this except to tell you how many times I have made soap that hasn’t turned out right, and olive oil and coconut oil are not cheap. I bought my scale at Wal-Mart, it cost about $20. Here is my recipe.
Chequamegongirl’s Cold-Process Soap
20 ounces olive oil
20 ounces vegetable shortening
12 ounces coconut oil (for lather)
16 ounces cold water
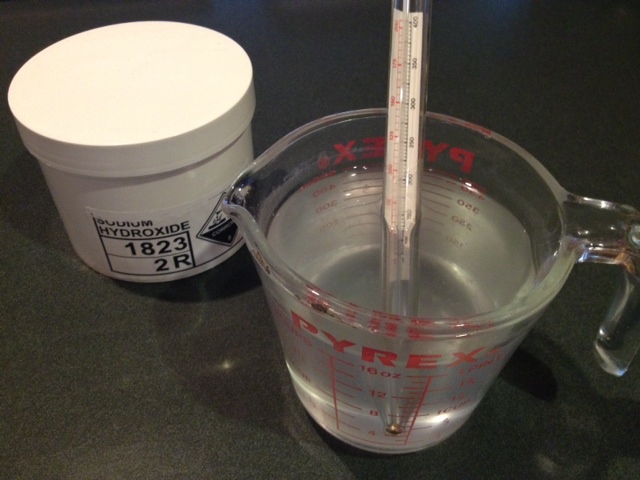
6 ounces sodium hydroxide (lye)
1 ounce beeswax
Essential oil (fragrance)
Before you begin, a word about lye. Lye is very caustic, and must be handled carefully. If used properly, there will be no problems, but remember that lye mixed with water will burn your skin on contact and it is very corrosive. Be sure to work slowly and carefully.
You will need 2 candy thermometers, a glass, stainless or enameled cast iron pot, 2 cup glass measuring cup (or a beaker), safety glasses, gloves, and some sort of mold to put your soap in. I have a soap box, but you could use a heavy-duty cardboard box. Line the box with saran, I use the press and seal stuff; it is much easier to work with.
Weigh the oils and put them in the pan and melt them over medium-high heat. Add the beeswax when the oil has melted.

The beginning of something great!
Measure the water (you don’t need to weigh this) in the glass measuring cup. Weigh the lye and carefully pour it into the measuring cup. You should wear glasses and gloves when doing this. Also, do it near the stove and turn on the exhaust fan so the fumes don’t bother you. If you don’t have an exhaust fan, stand as far away as possible when doing this. Gently and slowly stir the lye/water mixture. Only touch the handle of the measuring cup, adding lye to water will produce a chemical reaction and the temperature of the mix will rise rapidly. Stop stirring when the lye has dissolved. Rinse off the spoon before placing it anywhere! Place one of the thermometers in the measuring cup.
Use caution with the lye/water mixture!
When the oils have melted, take the pan off the burner and place it on a trivet or a cool burner. Place a thermometer in the pan and secure it to the side. When both the oil and the lye/water mix cool to 97-99 degrees, pour the water mixture into the oil and stir. It should saponify immediately. Sometimes your oils and water/lye mix don’t cool at the same rate. You may need to re-warm in a hot water bath or cool in a cold water bath to have them both at 97-99 degrees. Just use your kitchen sink, and take your product out of the bath one or two degrees before your desired temperature as it will continue to cool or heat and you don’t want to go back and forth in cold and hot water baths!

Oils in cold water bath.
Now you can add your fragrance. Some craft stores sell premixed oils just for soap, but I like to use essential oils. In this last batch, I added about 2 T of bay and 1.5 T of juniper. Put in more than you think because the fragrance tends to fade while the soap cures. Then pour your soap into the mold. Do this carefully because it is still very caustic.

Cover the mold with saran and carefully carry the mold to a warm spot in your house and wrap it up in a blanket (one that you don’t like and can get wrecked, because it might! My last batch leaked out of the mold a little.) The soap needs to stay as warm as possible for the next 15-24 hours. It will harden, then go through another chemical process and liquefy again. Tomorrow it should be hard enough to remove from the mold and cut.

Keep your soap warm!
I use a vegetable crinkle cutter to cut my soap, but a wire works well, too. Then put it in a box for 14-30 days and let it cure. It may get a little white on the corners, that’s called soap ash, and it’s no big deal. When the soap is hard and has lost it’s oiliness, it’s ready to go. I want to make a label for my soap, but it needs a name. Any ideas?

Ready to cut, but not to use.

Now you patiently wait!

This is amazing. My soap turned out just perfect and I love the round soap. Next time I might use all three of my cylinders. Thanks for your help!!!